Friday, 7 October 2011

Keywords


Keywords are predefined reserved identifiers that have special meanings.They cannot be used as identifiers in your program.
Here are some of the C++ keywords and their uses.

array          =  Array is not part of the type
break         =  Stops the execution of the scope in which it is located.
bool           =  It can give only two things True or False
case          =  This is used in switch statements to specify certain cases.
char           =  Used to declare character variable or array (string).
class          =  This is used when we are declaring classes.
const          =  For declaring const variable,a variable which cannot be changed.
continue     =  This is used when we want something to skip and move next.
delete         =   It is used to delete dynamic memory which we have used.
default        =   This is used in switch, and every condition has default condition.
do               =  This is used to perform multiple tasks under a condition.It is a loop keyword.
double         =   It is a type of variable and used to declare double variables.
else             =   It can be used when there is an if statement or multiple if statements.
false            =   It is used with bool keyword because bool returns only true or fasle.
finally          =  This is used in exception handling.
float             =  It is a type of variable used to declare float variables i.e. decimal numbers.
for               =  This is used to perform multiple tasks under a condition.It is a loop keyword.
if                  =  It is used to check certain conditions.      
inline           =  When you are defining function outside the class but want to make it inline.
int                =  It is a type of variable used to declare int variables i.e. whole numbers.        
long             =  It is a type of variable used to declare long variables.
namespace  = Identifies and assigns a unique name to a userdeclared namespace.
new             = It is used in the declaration of dynamic memory.
return          = This is used in functions
sizeof          = It is a built in function which tells the size of any variable or array.        
struct          = It is used in structure declaration which are user define data type.        
static          = It retains value unless any mathematical operation applied on the variable.
switch        = It is a bundle of cases to use one at a time otherwise default will run.
template    = It's declaration specifies a set of parameterized classes or functions.
true            = It is used with bool keyword because bool returns only true or fasle         
typename   = Tells the compiler that an unknown identifier is a type.
unsigned    = Unsigned types can only represent positive values (and zero)
union         = A union is a user-defined data or class type.            
virtual        =  The virtual keyword declares a virtual function or a virtual base class.
void           = It means nothing and it is used to mention return type or argument.
while         = This is used to perform multiple tasks under a condition.It is a loop keyword.

Libraries

In C++ and other languages their are libraries which have extension ".h" and it is a collection of classes and functions.C++ Programming language has a vast library called the Standard Template Library(STL).Those libraries which are built in are called STL.We can also built are own libraries and we'll tell you later own that how to create your own libraries.C++ includes the C library as described by the 1990 ISO standard
Here are given some of the libraries to check out their use check and trace your own desired library.

C standard libraries

iostream                                      iostream.h            (input/output stream)
                                                   conio.h                (console input and output)
cstdio                                          stdio.h                 (standard input/output header)
cstdlib                                         stdlib.h                 (functions involving memory allocation)
cmath                                          math.h                 (basic mathematical operations)
cstring                                         string.h                 (string related & memory handling                                                                                      functions)
windows                                     windows.h              (commands related to windows)
fstream                                        fstream.h              (to save data on the hard rive)
ctime                                           time.h                   (to get time of PC)
cctype                                         ctype.h                 (to convert from small to capital and                                                                                    vice versa)


Syntex  :                    # include<name.h>  
                                              #include<iostream.h>
                                            OR
                                    #include<name>  
                                               #include<iostream>

Thursday, 6 October 2011

Data Types

If you consider your daily life then just imagine that in daily life you have different type of data around you e.g. names , roll no. , cell no. , email id , percentage , GP etc.You have seen that their are different type of data we have to remember or we have to calculate.In every language their are certain data types on which we perform certain calculations or tasks and every data type has certain limitations and we cannot exceed it.

Certain data types are floating point , integer , char , Boolean.A chart is shown here which will show you the ranges of them according to their platform.


It is better for you to know about  Signed and Unsigned.Now two questions arises..??
  • What is Signed ?
  • What is Unsigned ?

Signed
 Signed is basically by default variables e.g. whenever we initialize a variable (int x) it is by default signed i.e. that it contain both positive numbers and negative numbers in its range/limit.In case of integer type range will be i.e. -32768 to 32767.

Unsigned is basically when we don’t need negative numbers in our scenario or condition and only want positive numbers then we use unsigned with our initialization e.g. ( unsigned int x ; ) and range of int when it is unsigned will be 65534  i.e. 2*32767..This keyword "unsigned" before the initialization of any data type.


Tip : If you'll use this type in your codes then it can prevent your code from distortion.Best example of unsigned is unsigned long and it can store 0 to 4 billion.

Historical Background Of C++


C++ is evolved from C, which is evolved from previous two languages. As you know everything is not perfect and it has some draws and limitations for those purpose new languages are evolved.

In 1963 the CPL (Combined Programming Language) appeared with the idea of being more specific for concrete programming tasks of that time than ALGOL or FORTRAN. Nevertheless this same specific feature made it a big language and therefore difficult to learn and implement.

In 1970 Ken Thompsons modeled many features in his language B after their counterparts in BCPL (Basic Common Programming Language) and used B to create early version of the UNIX operating systems at Bell laboratories.

In 1973, Dennis Ritchie has evolved C form early B at Bell Laboratories. C uses many important concepts of BCPL and B. C initially became widely known as the development language of the UNIX operating systems. Today most operating systems are written in C and/or C++.

C++, an extension of C, was developed by Bjarne Stroustrup in the early
1980 at Bell Laboratories. C++ provides a number features that
“Spruce up” the c language, but more importantly, it provides capabilities for Object-oriented Programming. In 1985 the first commercial releases of the language appeared as well as the first edition of book.

Tuesday, 4 October 2011

Converter

Most of you are familiar with converters but if anyone of you is not familiar with them that.
  • What they are?
  • What is their importance?
Then this is the time to know them and their importance when they will solve your problems mostly.I'll tell you that how you can convert such difficult conversions so easily by using an Application.Now you are thinking that which sort of app is this then here is your answer.
Today we are introducing another awesome application of chrome which will convert your difficult conversion in seconds.I don't know why you are not familiar with it but it's Ok.We are here to introduce such things and upgrade you with technology.Google chrome is launching different sort of applications which are mind blowing , awesome and helpful for us.

Here is the link of that application install it on your Google Chrome browser and enjoy.


                Converter


What are you waiting for ??
Download chrome now and start your new journey of  fastest and securest  browsing.


Note : If you want to Download Chrome then check this post.
Chrome

Gojee

As we have told you chrome is performing his best to enhance and upgrade it different browsers have their own extensions for everyone.It depends that which sort of interest you have and today we are going to tell you about one of its Extension which is related to Food.

If you are not using Google Chrome then use it from today because it is the best and fastest browsing software.They have launched an application with which you have access to get favorite Recipes from the WEB.

This application of chrome is basically for those who Love FOOD and want to eat something new.For those who want new and interesting recipes then they should try it and they will send you recipes too in mail but it depends that you have provided them your mail ID.

Here is the link of that application install it on your Google Chrome browser and enjoy.


                       Gojee


What are you waiting for ??
Download chrome now and start your new journey of  fastest and securest  browsing.


Note : If you want to Download Chrome then check this post.
Chrome

Sunday, 25 September 2011

Gmail Offline

If you are not using Google Chrome then use it from today because it is the best and fastest browsing software.
They have launched an application with which you have access to you Gmail no matter you are connected or not.It is available in Chrome only.

Here is the link of that application install it on your Google Chrome browser and enjoy.


         Offline Google Mail


What are you waiting for ??
Download chrome now and start your new journey of  fastest and securest  browsing.


Note : If you want to Download Chrome then check this post.
Chrome

Customizing Google Search Engine

Today we are going to tell you that how you can customize your Google search engine into the color schemes & fonts that you like.If you want your name to be appeared on Google instead of Google logo ? Then no need to worry we'll play with Google search Engine and customizing it fully.
Here is the method follow these steps to start it today.

Step 1 :
Open website www.google.com
As we are going to customize Google search engine then first we have to open their Search Engine.Open Google.com


Step 2 :
Type Google Shiny in search box.
Type Google Shiny in the search box and we'll tell you next that what to with it.


Step 3 :
Press I'm Feeling Luck.
Are you feeling luck?
Well it's the time to press "I'm Feeling Lucky" because then game will begin.


Step 4 :
Website opened.
Here we go !!
This cool website has been opened now we are going to customize our
Google Search Engine through this website.


Step 5 :
Type Your Name > Choose Style.
First of all type your Name in the second column and then choose your Style.
As soon as you'll choose style it will show you the result without pressing Enter so type name first and then choose style.


Step 6 :
Done !!
Congratulations.!!
We have customized Google Search Engine and now try this today and tell it to others too.

If you want your customized search engine to be appeared every time whenever you open your browser then Press on "Set as HomePage!" and it will show the address of your customized engine paste it your Home Page section in browser settings.


Thursday, 22 September 2011

Mounting ISO files

We are going to mount ISO file which we have download form the WEB but be sure that before this you have Daemoon Tools installed on your PC.What we are going to do is opening ISO file in this software and the technical term for it is "MOUNTING" we cannot say it installing ISO file it is mounting.This is the method with which we can create Virtual drive of the game that we have downloaded.Any time we want to execute it, we just open that virtual drive and enjoy.
Here is the method with which you can mount ISO files.Follow these Steps.

Step 1 :
Open Daemoon Tools > Press Add File.
Open Daemoon Tools and here is the interface of this software now Press Add File .A menu will be appeared which will ask you to browse your file from the PC drives.


Step 2 :
Open ISO file > Press Open.
Find the directory in which you have download ISO file and after doing this select it and press Open.


Step 3 :
Press Mount.
Notice that the file is now in the Software interface and now Press Mount Step to start installing game.


Step 4 :
Press Install Button.
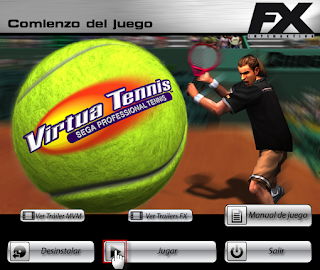
In this case language of downloaded game is different but whatever your game is just press Installing button and keep moving.


Step 5 :
Installed.
My Virtual Tennis Game is Installed and now its time to enjoy.


Step 6 :
Finalization
Game has been installed and now it will finalize some of its components and then we can enjoy !!


Step 7 :
Press Play and enjoy.
As soon as installation complete this Box will appear and it'll say you to Play and then press Play and enjoy.
In your case as the game will be different so this box will also differ so Whatever it is Press Pay and enjoy your new game.This box is the indication that virtual image of the game has been created successfully.


Step 8 :
Checking that Image has Been Created.
Our image of this Virtual Tennis game has been created successfully as you can see in the Image Catalog  it is showing the image which has been created.

To check this thing open Daemoon Tools after the installation of the game.


Step 9 :
Paying Game from the Desktop Shortcut.
In case after the installation of the game box will not appear then follow your desktop shortcut and play it from there.Open it and Start Playing.


Step 10 :
In case Game doesn't Work.
In case your game does not open or showing error then it means that there is a problem in its virtual image (Drive).
If it happens then
1- Open Daemoon Tools.

2- Check Recently Used Images.

3- Select it and Press Mount button.

After performing these three steps you'll notice that your virtual drive will be reconfigured and it will also appear in Image Catalog now play it and start enjoying.


Note : If you don't know that How to install Daemoon Tools Or need that software then check this Post.
Installing Daemoon Tools

Installing Daemoon Tools

When you'll download game form the WEB through torrent then you may notice that the extension of the file is "ISO" and to open "ISO" file we need a software to run it.Basically when we use software for these sort of files we are actually creating a virtual drive (ROM) which will execute our game or ISO file.Here is the method with which you can install this software easily.Follow these steps

Step 1 :
Open the Setup.
Double Click this Setup and start installing it.Don't worry we'll tell you that what you have to do next.
Follow these steps..


Step 2 :
Choose Your regional Language.
Choose language which is your regional because if you'll  choose any language rather than regional then it'll create mess for you to understand this software interface later.
I have Chosen English you can also choose this : )


Step 3 :
Press Next.
You know that mostly we press next whenever we are installing any software.So this time also press next and keep moving.


Step 4 :
Press I Agree.
If you have any contradiction with the terms and condition and you have read all of the terms then you can cancel it !!
But if you'll do this then you know that you cannot install it and then you have to find any other and I know you'll agree so press I Agree and go on.


Step 5 :
Choose Type > Press Next.
If you have not purchased then you can try it for free licence which means that you can use it for only 30 days i.e. month.
I have purchased it that's why I have chosen this well the choice is yours.After choosing Type of software then press Next.


Step 6 :
Press Next.
This is the dialogue box in which it will ask you to choose additional products of this software and then proceed.If you don't want their additional products or components then Unchecked first three boxes and just choose last two boxes and then press Next .


Step 7 :
Choose Browser Or Just Press Next.
I have unchecked "Browser's Start Page" because I don't need their browser.And then press Next.


Step 8 :
Choose Directory > Press Next.
Choose you directory in which you want to install this software and you have at least space available for it i.e. (12 MB) at least.
After choosing directory press Next and now your work is almost completed.
In the very next step installation will be completed.


Step 9 :
Installing.
Installation is completed and now its time to finish it start opening ISO files.


Step 10 :
Press Finish.
Congratulations.!!
We have installed it.

It is recommended you to choose Reboot Now
because if you'll reboot it now then it'll be good and then it can create virtual (empty) drive and when you'll open ISO files then your virtual drive of that game will be created successfully otherwise some errors may occur which may disturb you at that time.


Wednesday, 21 September 2011

Customizing Your Windows

Changing windows appearance and themes by customizing it is not so difficult as people thought but it just need your time that do you really want to do it or not? So,if you really want to do it and customize your window then you'll got it all here.We'll tell you that
  • How to add additional themes in windows?
  • How to change the appearance of windows?
Here is the method that how you can do it by following these Steps.

Step 1 :
Follow This Path..!
C:\WINDOWS\Resources\Themes
You Should know about this because this is the folder with which you have to play.This is the path in which all of your windows built in themes are present.

What we have to do is just to place customized theme which you have downloaded from the WEB or if you have created it by yourself.


Step 2 :
Installing theme Patcher software.
Actually whenever you want to customize your windows you cannot do it without the help of a software.Here we are going to install "Universal Ux Theme Patcher".
Without it whatever you have downloaded from the WEB will not be displayed or work untill you have any theme patcher installed on your PC then appearance or themes will work.


Step 3 :
Press Patch !!
Just Press Patch you'll notice that after doing this nothing happen but a message will be appeared.Now What to do with that message check next step.


Step 4 :
Press Yes !!
Press Yes because system have to be rebooted to include this stuff in its windows settings.Then game will start !!


Step 5 :
Opening Windows Visual Style file.
I have my own collection and  I am going to change my windows appearance by using this file.The thing which is to be noted here is the extension of that file, files which are related to windows appearance have this extension "Windows Visual Style" whenever you want to use any appearance just open this extension file don't open any other type of file which is in that folder e.g ".dll" , ".info" etc because this may disturb its working.


Step 6 :
Press OK !!
You can notice that you have seen this sort of theme for the first time in windows!!
It seems that we did our work Successfully now main thing is to press OK to apply it on our windows.


Step 7 :
Done !!
Congratulations !!
We have customized our windows.Try this by yourself too and spread this to others.
Now Enjoy  !!


NOTE : If you need that software then check this post and download it.
Themes Customizing Software

Tuesday, 20 September 2011

Downloading Torrent file

If you have any question in your mind that
  1. How to Download them ??
  2. How to Run these files ??
Then, these are the following and simple steps to have access to torrent files and it contains answers to all of your questions.Just follow the following steps

Step 1 :  Downloading torrent Software.
         
          U-torrent

         
          Bit-torrent

          
          Vuze


Step 2 :  Downloading torrent file from a torrent website.


Few torrent Websites are :
Open any of these website and search your desired movie,game,song etc.When you'll find it then download its torrent file by clicking on the button (for downloading torrent files) that they have provided.

Step 3 :  Opening file in torrent software.

Double Click the file that you have downloaded but be sure that you have completed Step 1.It will open in the torrent software and ask you to Browse the directory in which you want to download it.After mentioning the directory or address Press Ok to proceed.

Step 4 :  When Download finish then open that file and enjoy.!! 

What is Torrent file

If you don't know about this type of file than no need to worry we will tell you about it.It is the most frequently used file now a days on WEB and you should have info about it so that you can know that it's awesome.

It is basically a File which has links with different sub links (which have files addresses) located on other sites.When we download this type of file form torrent websites we basically are grabbing our required file from the path which is in that file i.e. uploaded by other host and we are its client (User) because we are downloading them.We cannot download that file until we have a torrent downloading software.

It means to download these files we need a software from any of them.!!
They are much important in this modern age because they can download movies,games and songs with huge size i.e. You have access to all and advanced games,latest movies etc. 
Sounds Good.!!

Photo Viewer

Usually people think that what if they can change their option for the photo viewer and upgrade it to different and new photo viewer.The answer to there question is Yes and we are going to tell you that how you can do this by installing your favorite photo viewer and enjoy your pictures in a new atmosphere.

Here is a Software just download it and enjoy its awesome features.
  • New Slide Shows features.
  • Additional Transitional Effects.
  • Brightness Control.
  • Color adjustment etc.
As you can notice that this software has a lot of features instead of viewing and you'll definitely enjoy it.

Screen Capture without any Software

Sometime people want to capture their screen but they were wondering that how to do it? So, now we are going to tell you that How you can capture your screen without any software. Here is the method through which you can capture your screen within a minute.

Step 1 : 
Press the following key.
This key is located in every keyboard (Mostly it is located after function keys) just press it and you'll notice that after pressing it nothing will happen..So don't need to worry just follow next step.


Step 2 :
Open Paint Brush.
We just need a software in which we can open some file or any editor but we are going to use Paint brush which I think is better but you can also use Microsoft Office, Photoshop etc.What we need is just that software and then..


Step 3 :
Press Ctrl + V.
You can notice that interface of Paint brush is open and what we want to do is just to paste that screen that we have captured a moment before.So, press Ctrl + V or you can do this too Alt + E and then P.


Step 4 :
Captured.
Congratulations..!!
We did it without any software.

You can notice that our screen has been captured and now it is in Paint brush so the next step is to save it and I guess you know that how to do it : )
Now Enjoy it and spread it to others !!

Monday, 12 September 2011

How to do Windows Partition

When you were installing window and you'll reach on the step where you PC drives are visible to you and below them there are different options.Then this thing indicate that the time to do partition has reached.And today we are going to tell you that How to do windows partition ??
Here are some of the steps follow them and do what you want.

Step 1 :
Press 'D'
When you'll press 'D' then another set of options will be appeared which is actually the confirmation that do you really want to delete that partition.


Step 2 :
Press Enter to proceed.
You have to press Enter which is the confirmation that you really want to delete that partition.This will appear only once and then no matter how many partitions are there you just have to press Enter and one more key.
To know about that key move to next step.


Step 3 :
Press 'L'
You can notice that as you have choosen "C:\" drive it will be deleted when you'll press 'L'.And after that we'll move to the previous screen which will be showing that this partition is deleted or not.


Step 4 :
First "C:\" drive deleted.
This screen is the confirmation that you have successfully deleted your desired partition.You can notice that "Unpartitioned space" is visible on the screen which is the confirmation that drive is deleted.And now we are going to delete next partition which is "E:\" drive.


Step 5 :
Press 'D' again.
As I have told you that we are going to delete next partition that's why we are going to repeat previous procedure again.


Step 6 :
Press 'L'.
As you'll press 'L' you can notice that this drive will be deleted and same screen will be appeared but with little bit changing.


Step 7 :
Showing "Total Size" of  the Hard Disk.
You can see that both drives are deleted successfully and in the "Unpartitioned Space" a huge amount is visible this is basically your
Hard Drive size which is visible in MB.
Now we are going to create new partitions but for this Press 'C' and the move to the next step.

Step 8 :
Enter size of the first Drive.
You can notice that the previous huge amount which was this 326689 MB but I have entered only 8182 i.e the drive which will be created will have size of only 8 GB.
As I want my " C:\ " drive to be only 8 GB not more than that.This is the reason that I have entered such a low amount because it depend upon us that what we are going to install,much software or not.As I want only my window in C:\ that's why creating this.
Important :You can Enter any size which you want but do remember that only in MB.


Step 9 :
Partitions Created Successfully.
Congrats..!!
You have done your partition successfully.


Note : If you are facing any problem in installing window or drivers check these post too.
How to install windows XP ?
How to install Drivers ?